
[HOME]
[WEB ALBUMS]
[PROJECTS]
[ARCHIVE]
[DOWNLOADS]
[LINKS]
PROJECTS
Project PAOHRK-1: EME Antenna Controller
This is a short English summary of an article I wrote in Dutch for Electron, the monthly magazine of the Veron, the Dutch radio amateur organisation. Basically it should get you going in case you want to built this controller and use the Python script. Two systems has been built so far and work satisfactory.

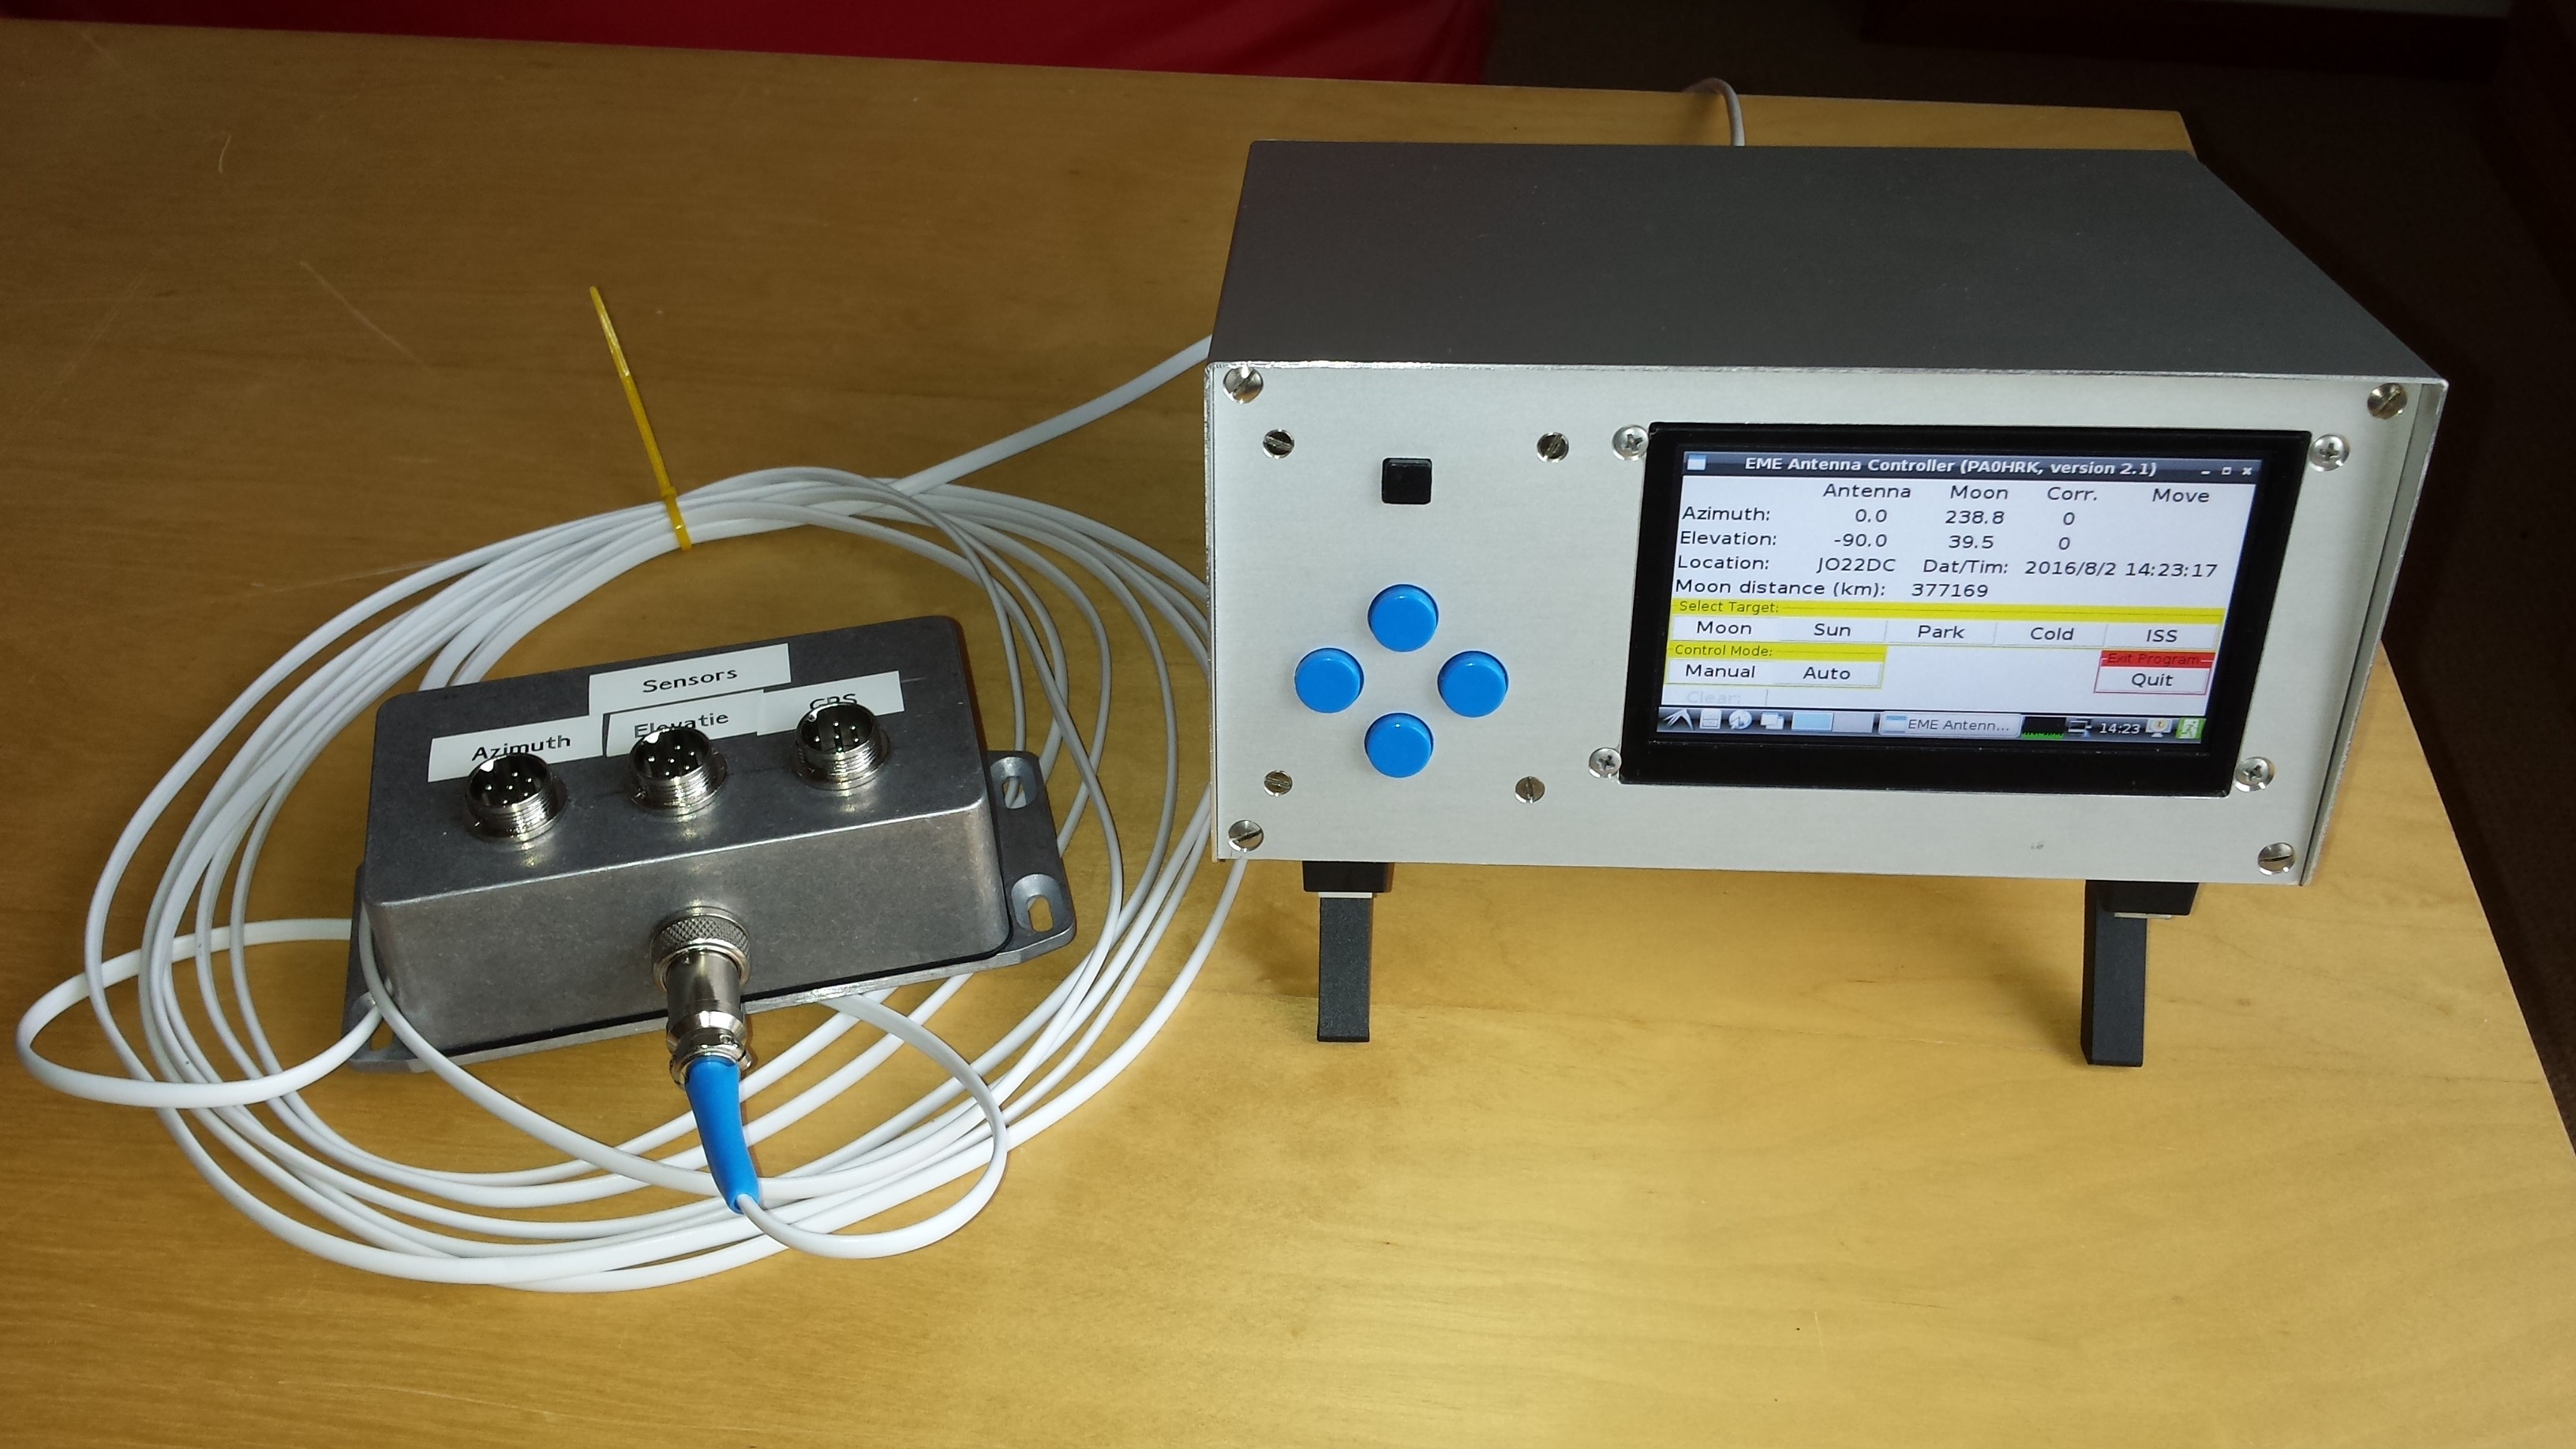
Fig.1 - Antenna Controller and Sensor Box.
System functional requirements
This controller is designed to keep antennas aimed at space objects like the sun, the moon and others, also TLE is implemented. It is a stand alone system operated by means of a touch screen and some buttons (up, down, left, right: blue and stop: black). Operation should be intuitive. The azimuth and elevation sensors are MAB 25 or equivalent, connected to an Arduino (designed by Hans, ON4CDU). The accuracy is about 0.1 degree. The data is transferred to the controller by means of an RS485 interface (6 bytes, 9600 baud, 8, N, 1). On request I can make a version for the F1TE system, also connected via RS485 (refer to Hans website). Mechanical inaccuracies can be entered and compensated for. The moon distance is shown. Elementary error resolution is provided. Doppler is not calculated as other software normally in use by HAMs is already providing this data. The controller can directly steer DC motors in a pulse width modulated mode up to 24V at about 5-7 amps max. I use a KR 1000 and a regular satellite actuator. Hard wired safety limit switches are required (and normally implemented).
Station specifics must be (once) manually entered in a special data file. The same is true for your desired parking position and cold sky coordinates. A good internal clock (DS3231, similar but better as the DS1307) provides date and time to calculate ephemeris data. GPS reception is not implemented yet. TLE data must be refreshed as needed manually. Software is free under GNU licence.
The system requires 5v at 2 amps max, but I have implemented a simple 2 A regulator to feed it from 12 V (battery). The power supply to the motors is separated.
Hardware description
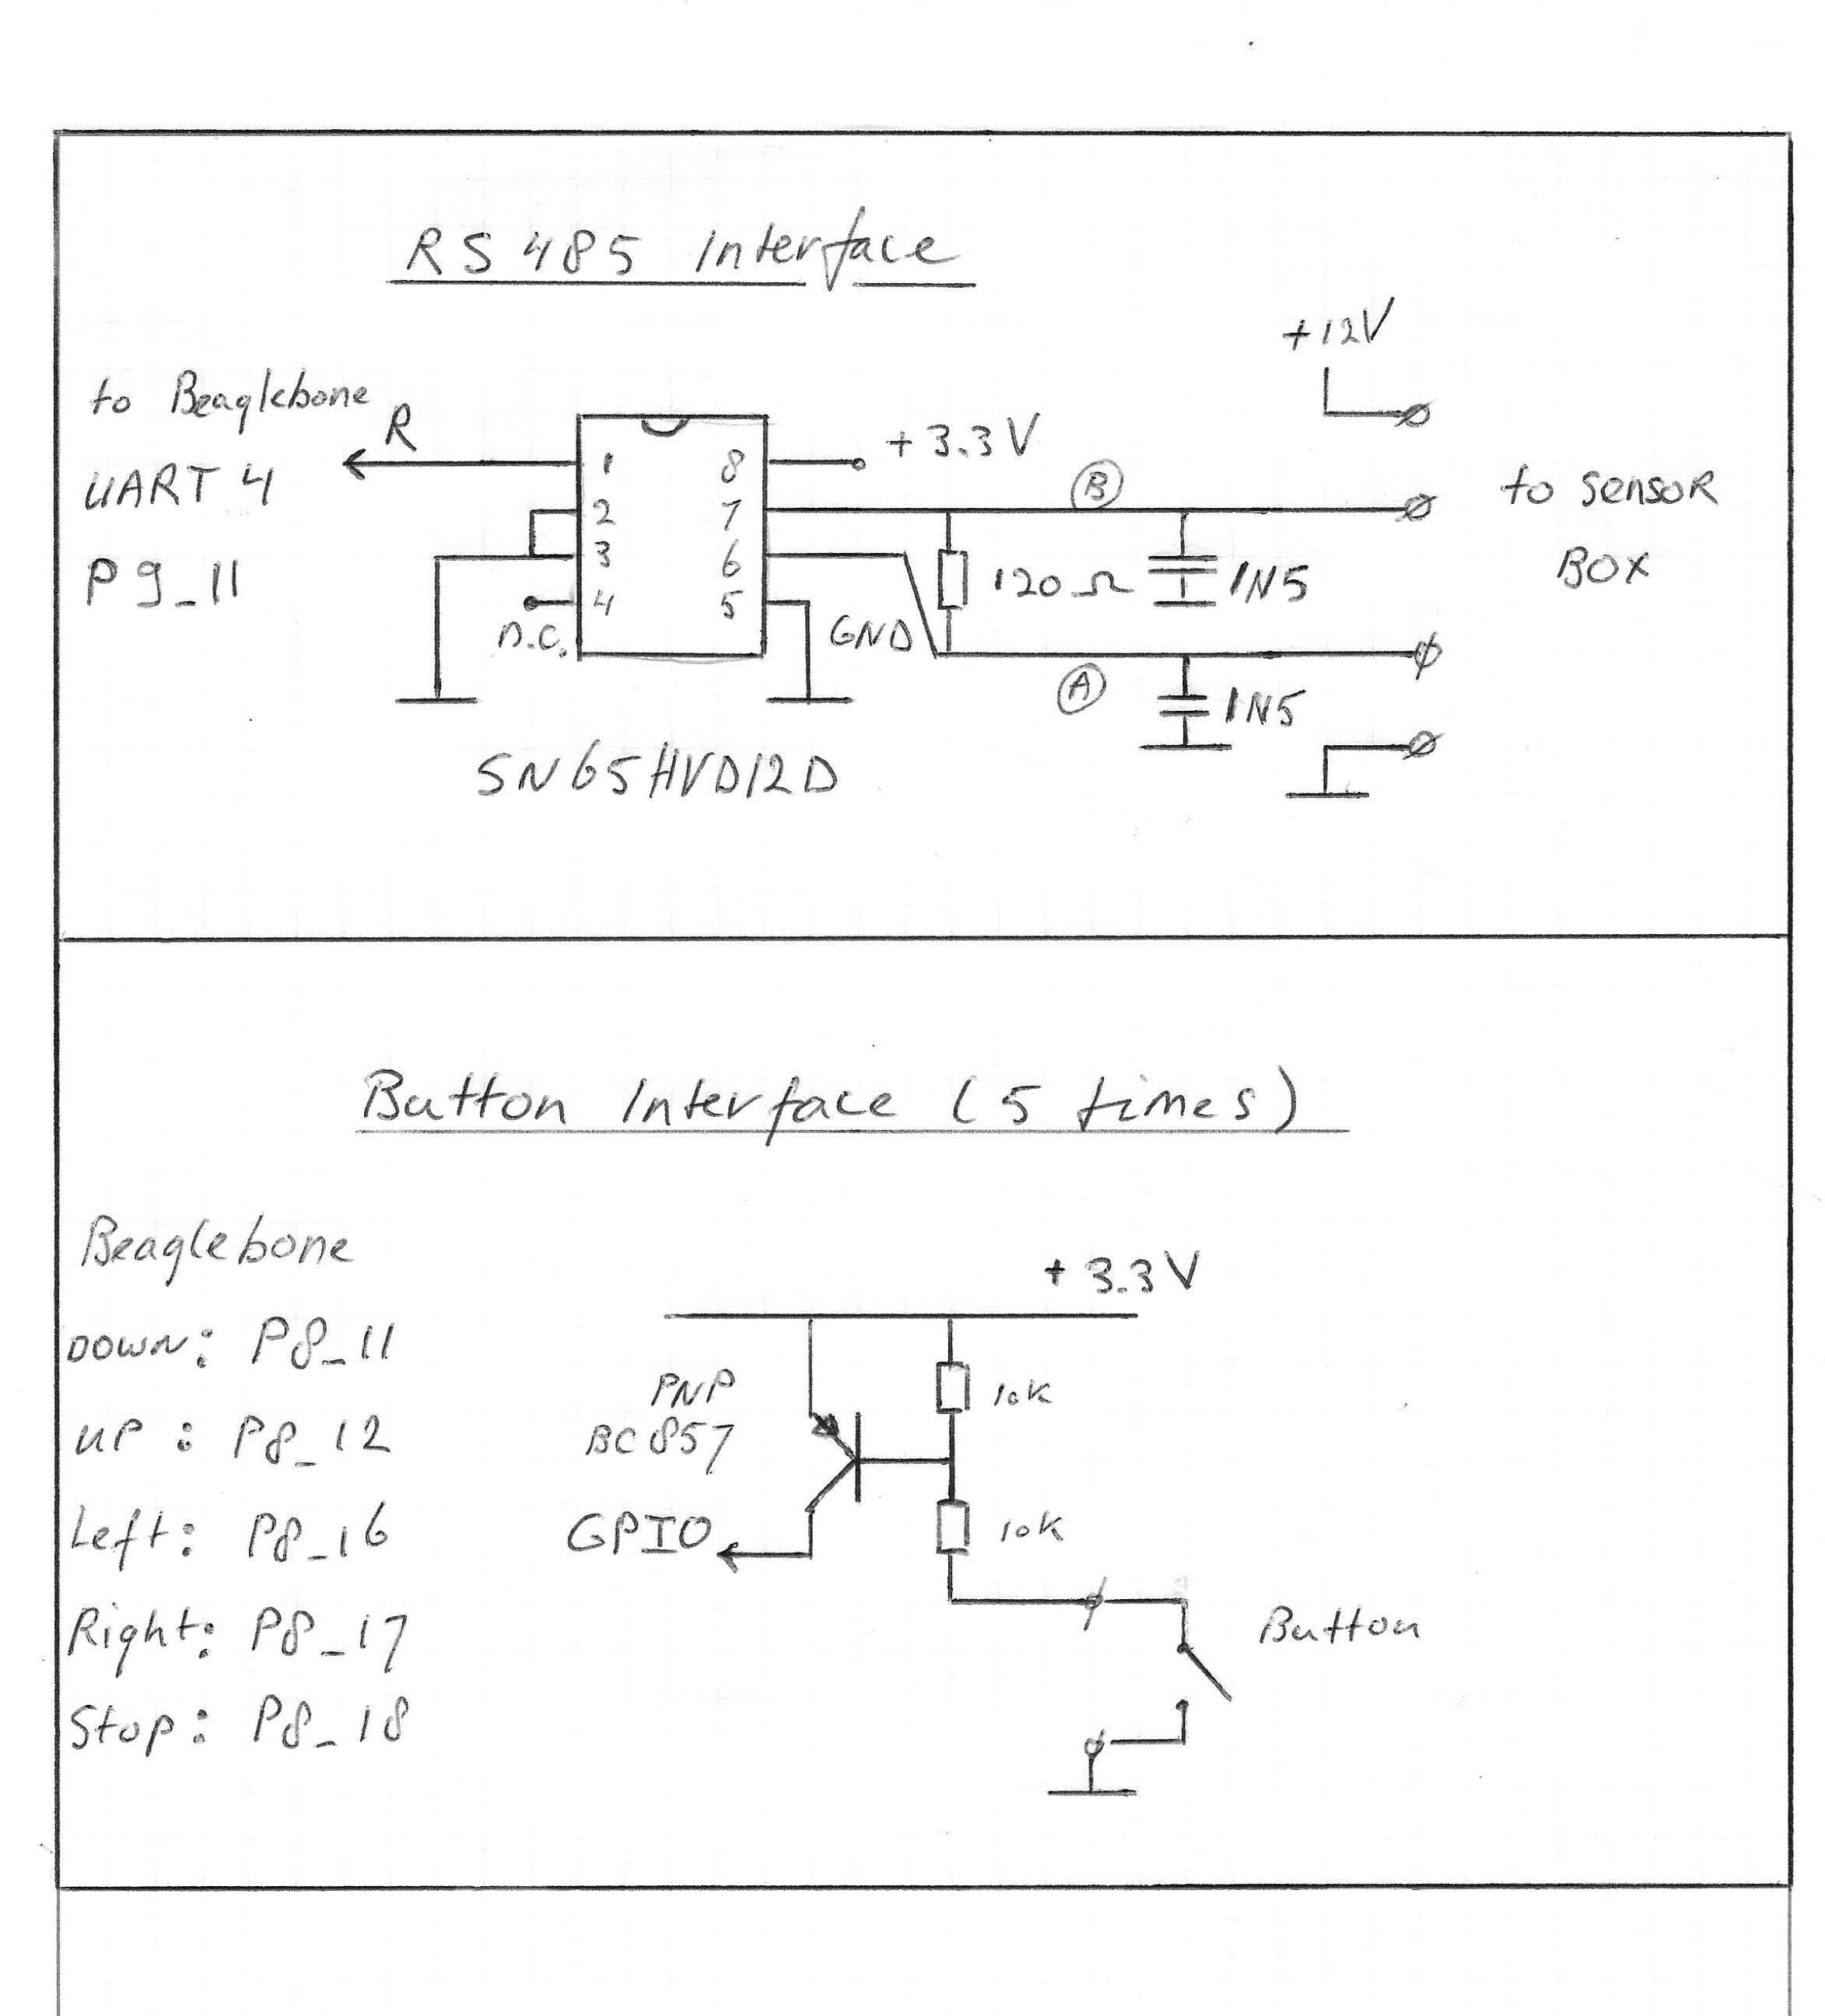
The hardware is based upon the Beaglebone Black (BBB) microcontroller. I did not want not make much hardware so you need two more boards apart from the touch screen (Chipsee, if no more available the 4DCAPE-43 should also work): a universal I/O cape (to host the button buffers with pnp transistors, the hw clock and the RS485 interface chip) and the Exadler DMCC dual motor control board. You can drop the DMCC cape and make your own motor control hardware connected to the standard PWM I/O of the Beaglebone. This has not been implemented by me obviously. This way you can also develop an interface for ac motors. Note: the DMCC and the display need a different i2c address. It is nice to have a keyboard and mouse connected via a small dongle to the BBB's large usb bus. Installation of the clock is described on the Adafruit website. For the connection of the five pnp transistor buffers and the RS485 interface (SN65HVD12D) refer to the drawing. I use a 4 wire cable for the data transfer between BBB and sensor interface: 2 for RS485, one ground and one + 12V. I use “aviation connectors” with different pin numbers for interfaces with Arduino, sensors and motors, so as to avoid connection mistakes. Dead cheap but reasonable good quality from Chinese vendors on the well-known auction site.

Fig.2 - Circuit diagrams interface.
Software development and Installation
A basic understanding of Linux (Debian) and Python is probably required although I can try and give support. I have Debian 7.9 lxde 2015-11-03 installed on my Beaglebone. I trust later versions will also work, but have not tested yet. It comes with Python (2.7), Nano (a simple text editor) and LXDE ( the gui). For development I use Notepad++ on a separate PC and WinSCP to transfer the scripts to the BBB. Lan connected to the same network of course. Once used to this setup it works very fast and convenient.
The motor control software is kept quite simple: if the trajectory to go is more than 5 degrees the motor runs at about 70% of max speed, between 2 and 5 degrees at about 50% and below 2 degrees at about 30%. The elevation motor in my case runs a bit faster that the azimut one. Below 0.12 degrees: stop, that is about the resolution of the control. Control is quiet and smooth.
You need two Python files; aceme.py and acmedat.py. The first one is the complete controller script. If you use the same hardware as I have and you do not need new or different functionality then you do not need to edit this file. The second file must be edited as it contains specific data of your location and mechanical system. There are some ways to do that, but I guess it is best done on the Beaglebone itself via the Nano text editor. The script should be self-explanatory. In fact the distribution kit contains the file: acemev21.py, or some higher number. V21 indicates the version number and should be edited out (“rename file”).
To get the application start automatically do the following: in LXDE open the File Manager (like Windows Explorer). Create a new folder “eme” under the “/debian” folder and place “aceme.py” and “acemedat.py” with WinSCP. The total path should be: /home/debian/eme.
Back in Debian start Nano:
sudo nano /etc/xdg/lxsession/LXDE/autostart.
In this LXDE “autostart” file you will see several lines starting with @. Add at the end:
@sudo python /home/debian/eme/aceme.py
and save. Apart from the @ sign, this is exactly the command you would have given manually. Re-start the system and observe the application will come up automatically.
As this is typically a learning project, please do not expect textbook quality software. A real Pythonist can improve a lot, I guess. Just expect a good working system. I am open for questions and suggestions.
Some references
“Real world Instrumentation with Python”, J.M. Huges; “An introduction to Python for absolute beginners”, Bob Dowling and: “A Byte of Python”, C.H. Swaroop, free and easy to find on the web. During development of the software I made ample use of search engines. I strongly advise you to do the same, so I only give some essential references:
Www.on4cdu.net/az-el/
www.f1te.org
learn.adafruit.com
exadler.myshoppify.com
www.element14.com
beagleboard.org
http://www.tkdocs.com/tutorial/intro.html
http://www.tutorialspoint.com/python/index.htm
https://www.codecademy.com/learn/python (a very good interactive course)
Copyright and licensing policies
1. All programs (scripts) in the HRK EME antenna controller project are open source and licensed under the GNU General Public License (GPL), Version 3. We think this policy serves the best interests of Amateur Radio. Open source makes it easy for others to read and learn from our code, and to suggest improvements. The GPL means that anyone may copy, use, modify, or adapt our code for their own personal use, in any way they choose. It is permissible to use our code (or code adapted or translated from our code) in a program made for wider distribution, whether you charge for the program or not, but in such cases the distributed program' s licensing must also conform to the GPL. Note that our code uses some libraries and algorithms which are themselves GPL licensed.
2. For added emphasis: It is NOT permissible to use our code (or code based on ours, a so called "derivative work") in any program unless that program is itself licensed with terms compatible with the GNU Public License (GPL), Version 3 or later.
The scripts can be found here:eme python scripts

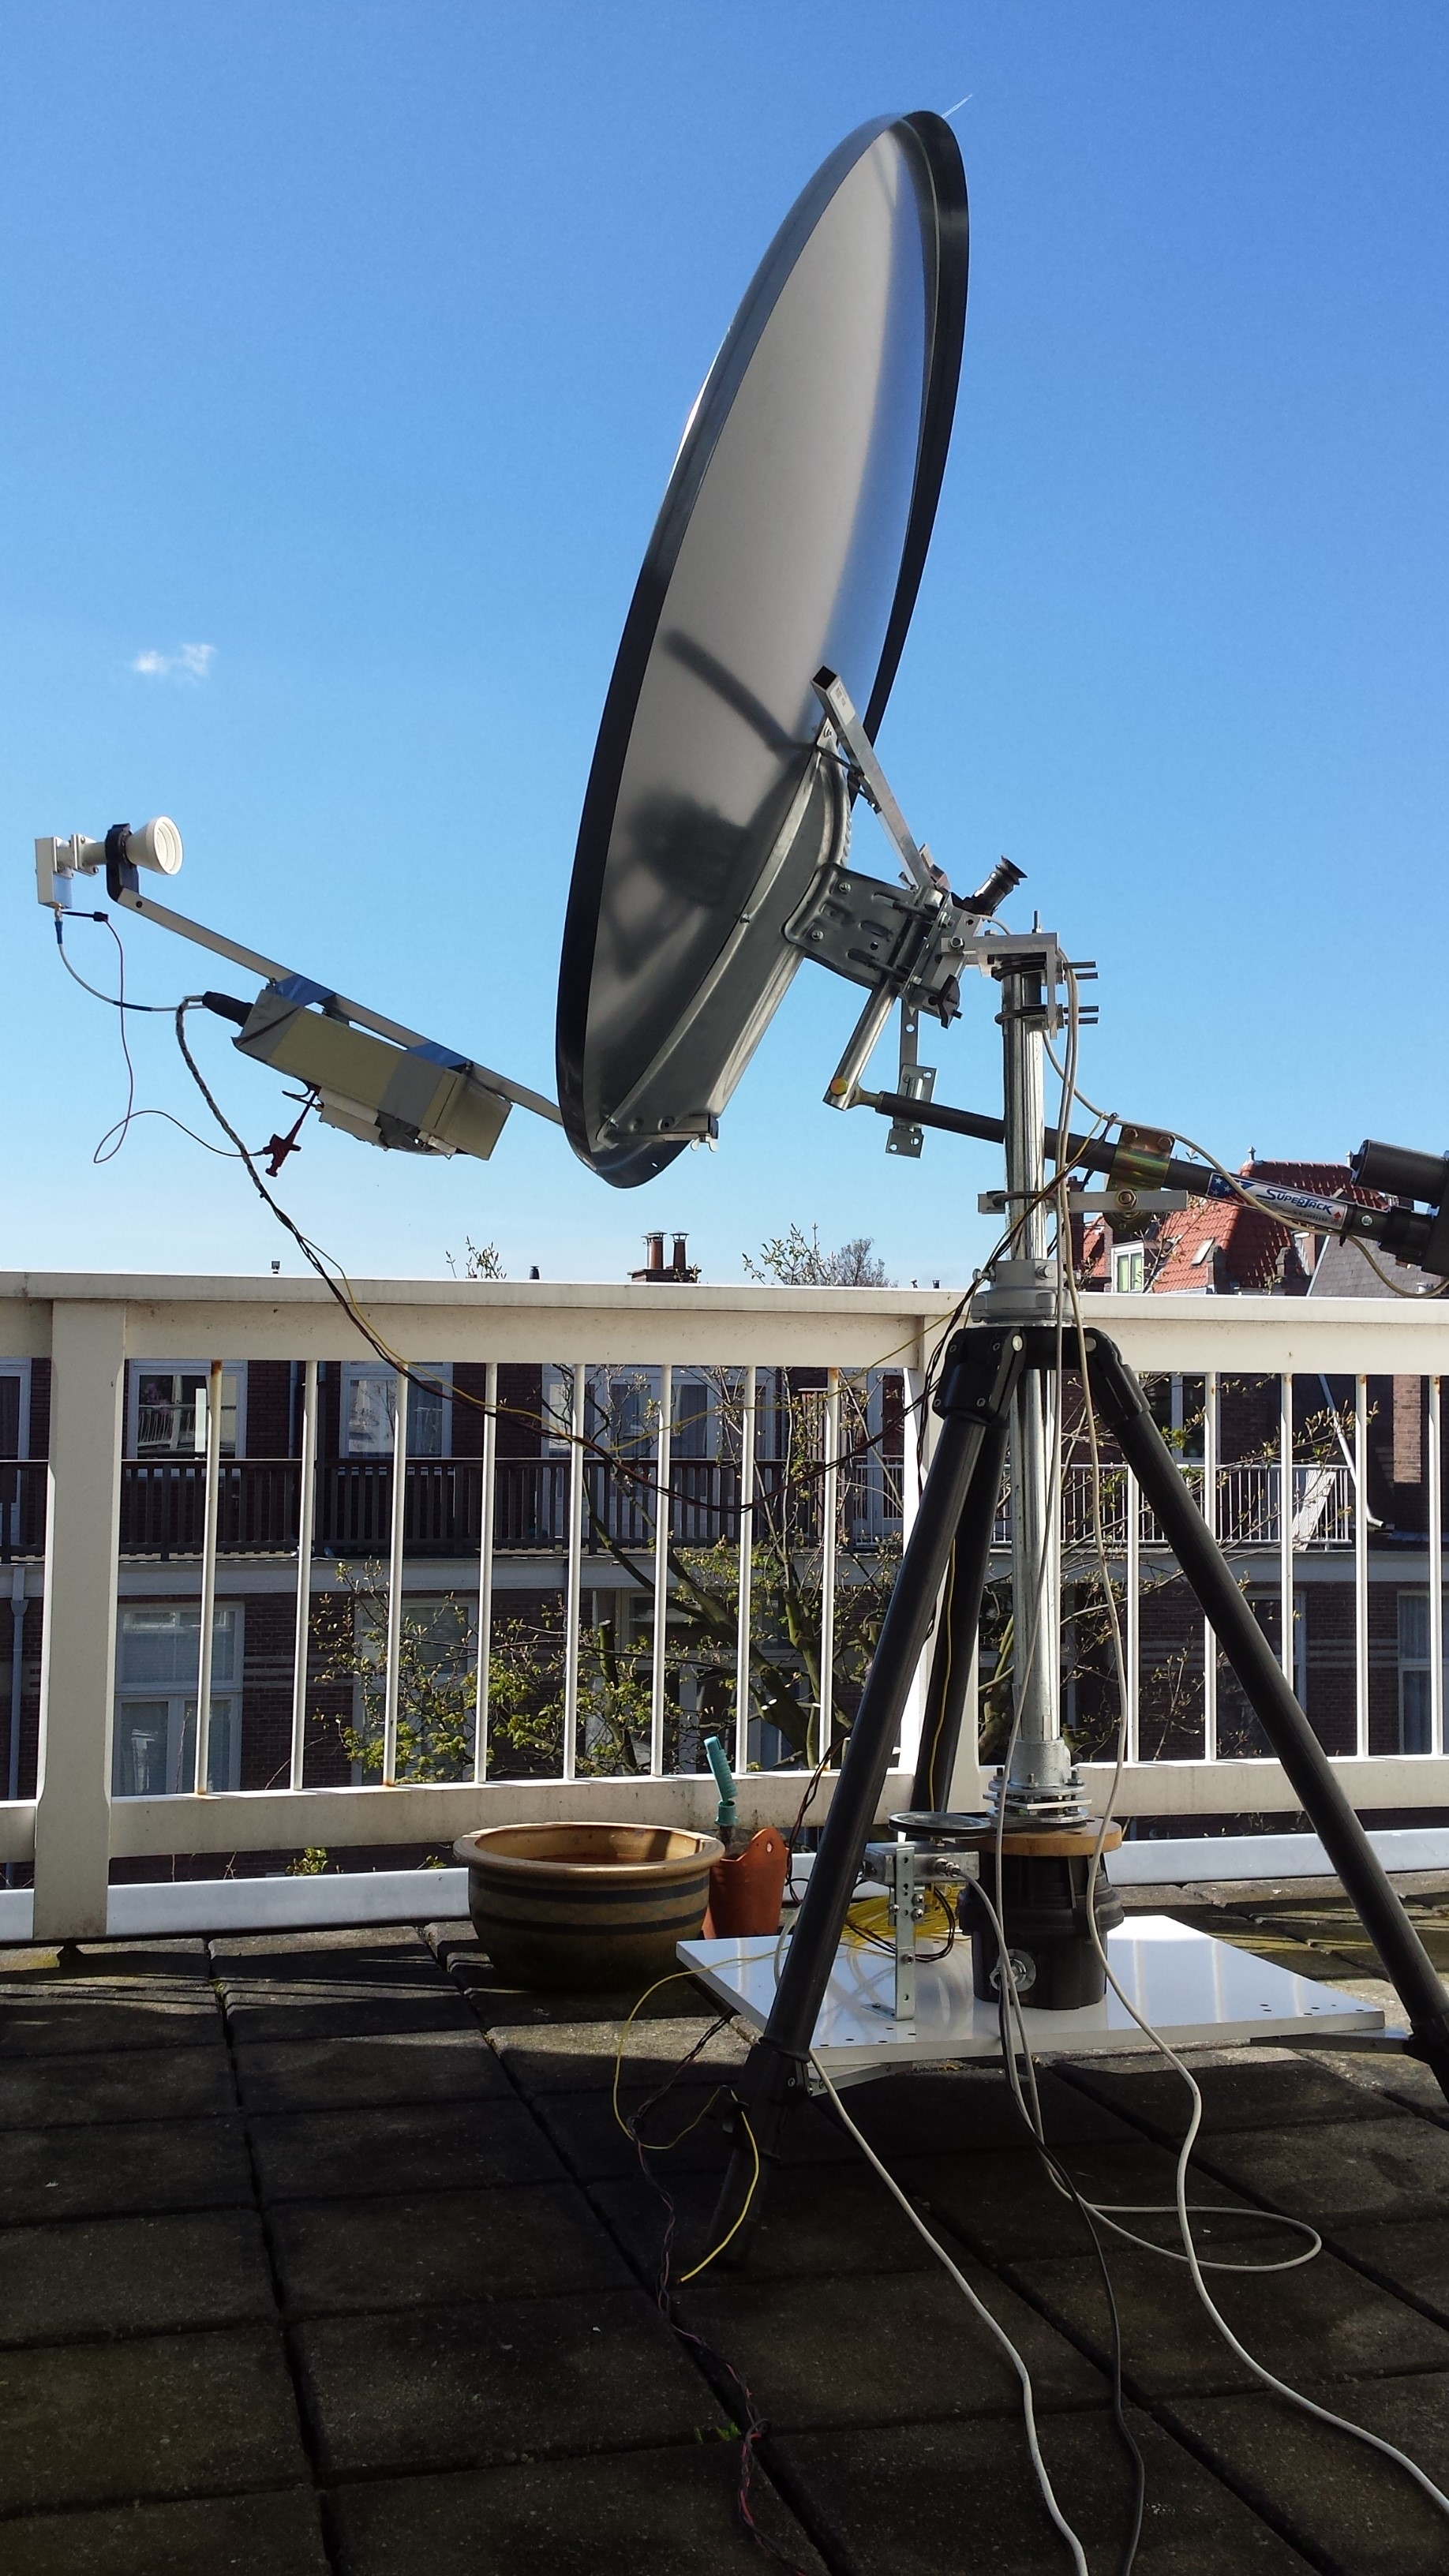
Fig.3 - antenna dish for 3cm and controller in action
Harke Smits, PA0HRK, pa0hrk@gmail.com, august 2016